Enforce sign-in for Desktop
By default, members of your organization can use Docker Desktop without signing in. When users don’t sign in as a member of your organization, they don’t receive the benefits of your organization’s subscription and they can circumvent Docker’s security features for your organization.
To ensure members of your organization always sign in, you can deploy a
registry.json configuration file to the machines of your users.
How is sign-in enforced?
When Docker Desktop starts and it detects a registry.json file, the
following occurs:
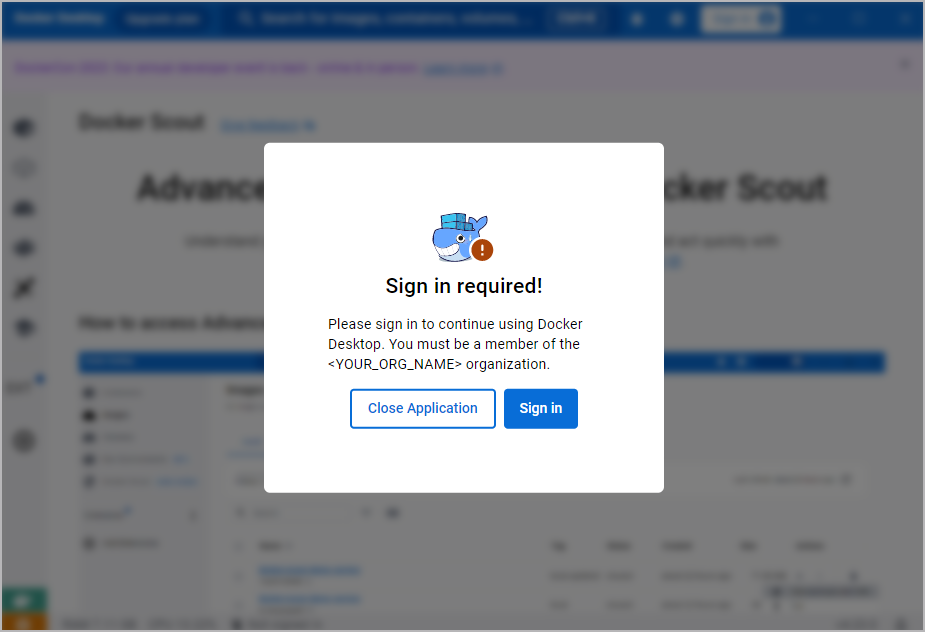
- The following Sign in required! prompt appears requiring the user to sign
in as a member of your organization to use Docker Desktop.
- When a user signs in to an account that isn’t a member of your organization, they will be automatically signed out and can’t use Docker Desktop. The user can select Sign in and try again.
- When a user signs in to an account that is a member of your organization, they can use Docker Desktop.
- When a user signs out, the Sign in required! prompt appears and they can no longer use Docker Desktop.
Enforce sign-in vs enforce SSO
Enforcing sign-in ensures that users are required to sign in to use Docker Desktop. If your organization is also using single sign-on (SSO), you can optionally enforce SSO. This means that your users must use SSO to sign in, instead of a username and password. When you enforce sign-in and enforce SSO, your users must sign in and must use SSO to do so. See Enforce SSO for details on how to enable this for your SSO connection.
Create a registry.json file to enforce sign-in
-
Ensure that the user is a member of your organization in Docker. For more details, see Manage members.
-
Create the
registry.jsonfile.Based on the user's operating system, create a file named
registry.jsonat the following location and make sure the file can't be edited by the user.Platform Location Windows /ProgramData/DockerDesktop/registry.json Mac /Library/Application Support/com.docker.docker/registry.json Linux /usr/share/docker-desktop/registry/registry.json -
Specify your organization in the
registry.jsonfile.Open the
registry.jsonfile in a text editor and add the following contents, wheremyorgis replaced with your organization’s name. The file contents are case-sensitive and you must use lowercase letters for your organization's name.{ "allowedOrgs": ["myorg"] } -
Verify that sign-in is enforced.
To activate the
registry.jsonfile, restart Docker Desktop on the user’s machine. When Docker Desktop starts, verify that the Sign in required! prompt appears.In some cases, a system reboot may be necessary for the enforcement to take effect.
Tip
If your users have issues starting Docker Desktop after you enforce sign-in, they may need to update to the latest version.
Alternative methods to create a registry.json file
You can also use the following alternative methods to create a registry.json file.
Create a registry.json file when installing Docker Desktop
To create a registry.json file when installing Docker Desktop, use the following instructions based on your user's operating system.
To automatically create a registry.json file when installing Docker Desktop,
download Docker Desktop Installer.exe and run one of the following commands
from the directory containing Docker Desktop Installer.exe. Replace myorg
with your organization's name. You must use lowercase letters for your
organization's name.
If you're using PowerShell:
PS> Start-Process '.\Docker Desktop Installer.exe' -Wait 'install --allowed-org=myorg'If you're using the Windows Command Prompt:
C:\Users\Admin> "Docker Desktop Installer.exe" install --allowed-org=myorg
To automatically create a registry.json file when installing Docker Desktop,
download Docker.dmg and run the following commands in a terminal from the
directory containing Docker.dmg. Replace myorg with your organization's name. You must use lowercase letters for your organization's name.
$ sudo hdiutil attach Docker.dmg
$ sudo /Volumes/Docker/Docker.app/Contents/MacOS/install --allowed-org=myorg
$ sudo hdiutil detach /Volumes/Docker
Create a registry.json file using the command line
To create a registry.json using the command line, use the following instructions based on your user's operating system.
To use the CLI to create a registry.json file, run the following PowerShell
command as an Admin and replace myorg with your organization's name. The file
contents are case-sensitive and you must use lowercase letters for your
organization's name.
PS> Set-Content /ProgramData/DockerDesktop/registry.json '{"allowedOrgs":["myorg"]}'This creates the registry.json file at
C:\ProgramData\DockerDesktop\registry.json and includes the organization
information the user belongs to. Make sure that the user can't edit this file, but only the administrator can:
PS C:\ProgramData\DockerDesktop> Get-Acl .\registry.json


    Directory: C:\ProgramData\DockerDesktop


Path          Owner                  Access
----          -----                  ------
registry.json BUILTIN\Administrators NT AUTHORITY\SYSTEM Allow  FullControl...
To use the CLI to create a registry.json file, run the following commands in a
terminal and replace myorg with your organization's name. The file contents
are case-sensitive and you must use lowercase letters for your organization's
name.
$ sudo mkdir -p "/Library/Application Support/com.docker.docker"
$ echo '{"allowedOrgs":["myorg"]}' | sudo tee "/Library/Application Support/com.docker.docker/registry.json"
This creates (or updates, if the file already exists) the registry.json file
at /Library/Application Support/com.docker.docker/registry.json and includes
the organization information the user belongs to. Make sure that the file has the
expected content, and that the user can't edit this file, but only the administrator can.
Verify that the content of the file contains the correct information:
$ sudo cat "/Library/Application Support/com.docker.docker/registry.json"
{"allowedOrgs":["myorg"]}
Verify that the file has the expected permissions (-rw-r--r--) and ownership
(root and admin):
$ sudo ls -l "/Library/Application Support/com.docker.docker/registry.json"
-rw-r--r--  1 root  admin  26 Jul 27 22:01 /Library/Application Support/com.docker.docker/registry.json
To use the CLI to create a registry.json file, run the following commands in a
terminal and replace myorg with your organization's name. The file contents
are case-sensitive and you must use lowercase letters for your organization's
name.
$ sudo mkdir -p /usr/share/docker-desktop/registry
$ echo '{"allowedOrgs":["myorg"]}' | sudo tee /usr/share/docker-desktop/registry/registry.json
This creates (or updates, if the file already exists) the registry.json file
at /usr/share/docker-desktop/registry/registry.json and includes the
organization information to which the user belongs. Make sure the file has the
expected content and that the user can't edit this file, only the root can.
Verify that the content of the file contains the correct information:
$ sudo cat /usr/share/docker-desktop/registry/registry.json
{"allowedOrgs":["myorg"]}
Verify that the file has the expected permissions (-rw-r--r--) and ownership
(root):
$ sudo ls -l /usr/share/docker-desktop/registry/registry.json
-rw-r--r--  1 root  root  26 Jul 27 22:01 /usr/share/docker-desktop/registry/registry.json
Deploy registry.json to multiple devices
The previous instructions explain how to create and deploy a registry.json file to a single device. To automatically deploy the registry.json to multiple devices, you must use a third-party solution, such as a mobile device management solution. You can use the previous instructions along with your third-party solution to remotely deploy the registry.json file, or remotely install Docker Desktop with the registry.json file. For more details, see the documentation of your third-party solution.